How to annotate solos using Sonic Visualiser
Introduction
This tutorial describes, how jazz solos are annotated in the Jazzomat Research Project using Sonic Visualiser. At the same time, it defines the internal structure of SV files that is required for melfeature to process these files for feature extraction.
First Steps
You can find good tutorials for using Sonic Visualiser on the official website as well as the official documentation. Here we just describe some basic functionalities that are useful for doing annotations.
File → Open → (select MP3 or WAV file to annotate)
Press Space to start / pause playback.
Use the Cursor keys (left & right) to navigate within the audio (forwards/backwards).
Use the Cursor keys (up & down) to zoom in / zoom out (changing the temporal resolution).
Remember to (regularly) save your current session via File → Save Session As.
For transcribing melodies, it is often helpful to slow down the playback speed
Use Playback → Slow Down / Speed Up to change the playback speed.
You can go back to the normal playback speed via Playback → Restore Normal Speed.
In the Sonic Visualiser, you can split the window into multiple panes, which are vertically stacked sub-windows.
Press N or Pane → Add New Pane to create a new subwindow.
Press K or Pane → Add Peak Frequency Spectrogram → All Channels Mixed to add a new subwindow with a Peak Frequency Spectrogram.
In each pane, you can define an arbitrary amount of annotation layers, e.g. for the waveform and an additional time instant layer. In each pane, you can switch between different layers using the index cards on the right.
Use Layer → Add New Time Instants Layer for annotating beats / chords / form part boundaries.
Use Layer → Add New Notes Layer for annotating notes (solos / melodies).
Use Layer → Add New Regions Layer for annotating phrases / phrase segments.
Use Layer → Add New Text Layer for annotating articulation classes or other text annotation.
All layer annotations can be edited by pressing the E key.
Annotation of the metric structure (beats / bars)
In order to annotate beat times while listening to the playback, you can either use an external MIDI keyboard (which must be connected your computer before you start Sonic Visualiser, you might need to restart the program if the keyboard is not recognized) or you can use your computer keyboard. The latencies (delay of tapped event) will be very likely larger for the computer keyboard than for the MIDI keyboard.
Before you start the annotation, add a new layer:
Layer → Add New Time Instants Layer
Then, you have to define the time signature of the music piece you’re annotating:
Edit → Number New Instants with → Cyclical Two-Level Counter → activate it.
Edit → Number New Instants with → Cycle size → 4 (for 4/4 time signature), 6 (for 6/8), 3 (for 3/4) etc.
Now you need to navigate to the beginning of your piece using either the cursor keys (left) as described above or the Rewind to start Symbol in the top of the user interface.
You start the audio playback using the Space bar. Now you can use any key on your MIDI keyboard or the ; key on your computer keyboard. As soon as you start annotating, the beat times will be stored and assigned to the correct beat and bar number according to the time signature you set before.
Note
Actually, the automatically annotated beat labels are ignored and can be safely deleted. Likewise, new beat events can be added to the beat track without proper label. Beat counting and metrical annotation is done implicitly, based on the annoated time signatures (cf. below), hence, at least one time signature must be given.
If you finished annotating, you can go back to the beginning of the piece and play it again. The annotated beat times are sonified with a click sound. You can then manually correct their positions (after selecting the arrow cross symbol on top of the program).
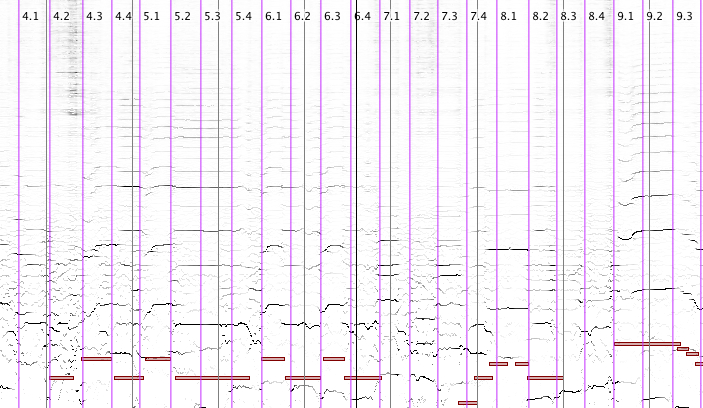
Here’s an example beat annotation:
Transcription of the melody notes
In order to transcribe the melody notes, it is useful to create a spectrogram view in the background, which shows how the energy is distributed over time and frequency. You can view percussive sound events (vertical structures) as well as harmonic note events such as notes. These are characterized by almost parallel horizontal structures (overtones). Usually the lowest overtone is the fundamental frequency, which indicates the note pitch.
Layer → Add Peak Frequency Spectrogram → All channels mixed.
In order to improve the readability of the spectrogram view, we recommend to change the colors
Colour → Black on White.
For the transcription, you need to create a note layer in the same pane:
Layer → Add New Notes Layer.
Also you need to select
Scale → auto-align.
so that the pitch values in the spectrogram and the overlaid transcription layer match vertically.
In general, you can change the instrument sound that is used for resynthesizing the transcribed note events during the regular playback using the mixer symbol on the right side of the transcription layer.
For the transcription, again navigate back to the beginning of the piece, press space to start playback and play the notes on the keyboard during the playback. As an alternative, one can also “paint” the notes after clicking on the pencil symbol. After clicking on the four-arrow symbol, notes can be modified & shifted.
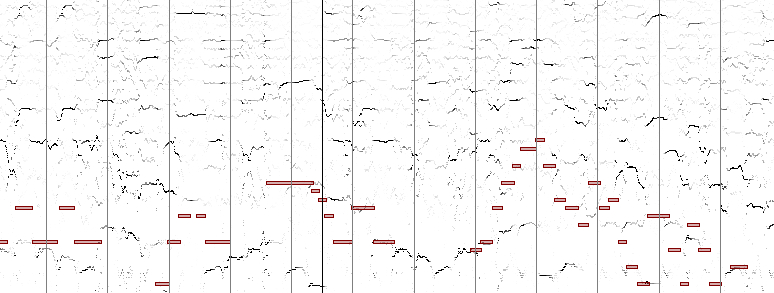
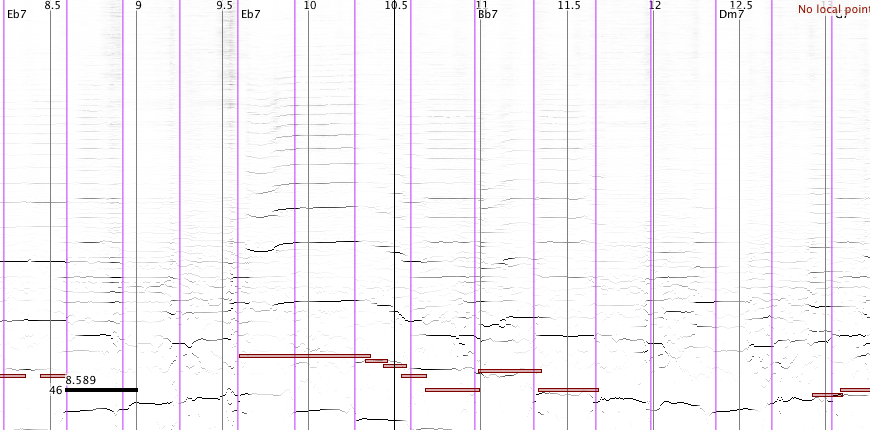
Here’s an example melody transcription:
Annotation of additional note information
You can add additional parameters that are associated with single note events. For example, for the annotation of note articulation techniques, we need an additional text layer:
Layer → Add Text Layer
After selecting the pencil symbol, we can draw text annotations close to notes in the note layer, here’s an example:

In the Jazzomat Project, the following abbreviations are used for annotating articulation techniques:
Articulation |
Abbreviation used for annotating |
|---|---|
bend |
|
shake |
|
vibrato |
|
slide (between 2 notes) |
|
fall-off (descend) |
|
dead-note |
|
dirty/split tone (rough sound, simultaneous singing / screaming) |
|
Top tones |
|
Note
The articulation text layer must be present for a valid Jazzomat SV file, but can be empty.
Grouping of notes to phrases
- In order to annotate musical phrases, we use the regions layer.
Layer → Add New Regions Layer.
Plot Type → Segmentation.
It’s important to place the phrase boundaries between note events. The phrase segments must fully contain all notes of the corresponding phrase. After selecting the pencil symbol, you can draw segments.
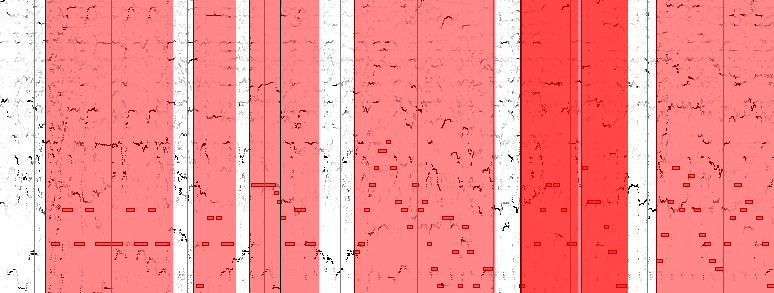
Here’s an example:
Chord annotation
In order to annotate chords, we use the beat annotation layer (see above) to include chord annotations (here we assume that all chord changes fall on beat times).
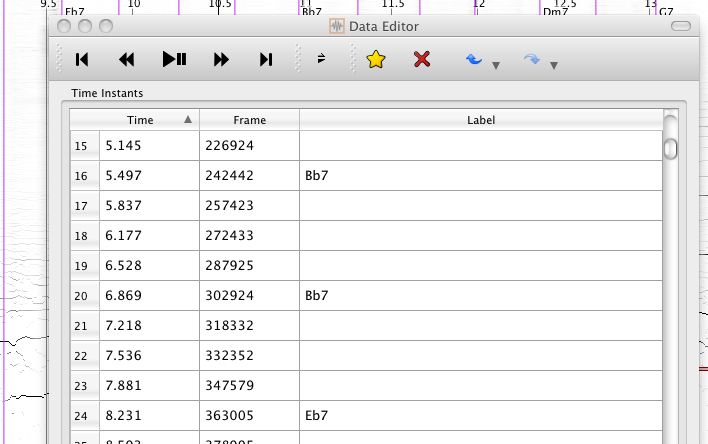
Select the beat annotation layer and press the E key. Enter the chord labels in the 3rd column:
If you want to keep the label number (e.g., 1.1), make sure that the chord labels are separated using a “:”
In the end it looks like this:
Chords for jazz solos can be taken for a score or leadsheet (e.g., from Realbook). Here’s the correct syntax to enter chords:
<flat>  ::= "b"
<sharp> ::= "#"
<none>  ::= ""
<slash> ::= "/"
<accidental> ::= <flat>| <sharp>|<none>
<noteletter> ::= "A"|"B"|"C"|"D"|"E"|"F"|"G"
<notename>   ::= <noteletter><accidental>

<basechord>  ::= <root><type>
<extchord>   ::= <basechord>|<basechord><tensions>
<chordlabel> ::= <extchord>| <extchord><slash><bassnote>|"NC"

<root>       ::= <notename>
<bassnote>   ::= <notename>
<major>      ::= "maj" | "j" | ""
<minor>      ::= "min" | "m" | "-"
<aug>        ::= "+" | "aug"
<dim>        ::= "o" | "dim"
<halfdim>    ::= <minor>"7b5"
<type>       ::= <major>|<minor>|<dim>|<aug>|<halfdim>
<tensions>   ::= <seventh><ninth><eleventh><thirteenth>|<alt>

<seventh>  ::= "7" | ""
<ninth>    ::= "9"<accidental>  |""
<eleventh> ::= "11"<accidental> |""
<alt>      ::= "7""alt"
Note
Attention for additional tensions: In contrast to the common notation, alterations (such as b9 or #11) need to be written after the number: 9b or 11# in order to avoid confusions with the chord symbols. For instance, a Cm7#5 chord must be spelled as Cm75#.
Note
Enter the time signature once at the beginning of the first chorus. Enter it later again only if the time signature changes. At least one time signature must be present, as well as at least one chord symbol and one form part, otherwise the SV will rejected.
Note
Here are two examples:
Example 1: 1.1:A1-Cj7-4/4, ALTERNATIVE A1-Cj7-4/4
Example 2: 8.3:F#m711# ALTERNATIVE F#m711#